How to fix a running toilet
.jpg)
Does your toilet keep running, no matter how much you jiggle the handle or press the flush button? You’re not alone. Don’t worry, we recommend getting professional help from our expert London plumbers, if you have enough time and skill, you can always DIY some projects. fixing a running toilet can be simpler than you think.
In this article, you’ll learn how to identify and fix the most common causes of a running toilet.
Diagnosing a Running Toilet
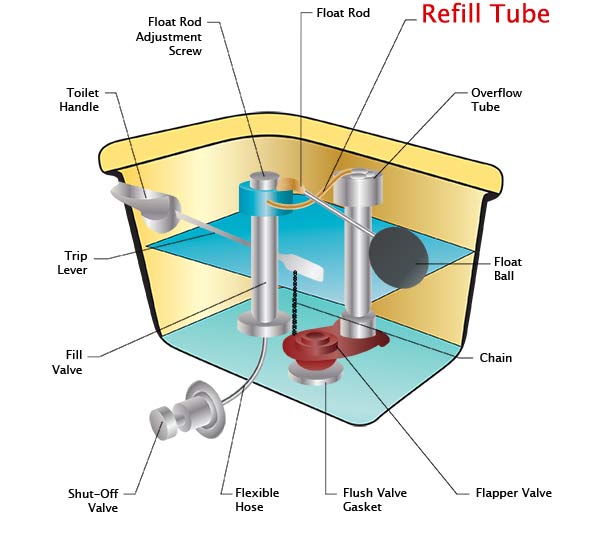
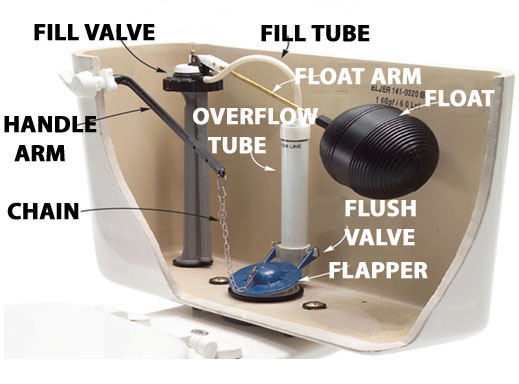
To fix a running toilet, first diagnose the problem by inspecting key components such as the overflow tube, fill valve, flush valve assembly, float arm, and fill valve tube. The overflow tube regulates the water level in the bowl, while the fill valve controls the water supply. The flush valve assembly consists of the flapper and lift chain, which may become clogged or fail. A faulty fill valve can also cause excess water to enter the bowl.
Once you’ve identified the problem, you can find solutions such as replacing a worn-out flapper or adjusting a faulty fill valve. For weak flushes, ensure the starting level adjustability range is between 1/2” and 1” and check for trapped air spaces. Seek help from local hardware stores if needed, and make sure to test the toilet several times before restoring the cover. By updating to smarter, cost-efficient models and maintaining routine testing, you can save money and avoid repairs in the long run.
Common Causes of a Running Toilet

A running toilet is a common problem that leads to higher water bills and wasted water. Luckily, the issue is usually easy to fix.
The most common cause is an incorrect water level in the tank, due to an old fill valve assembly or dirty flapper. Other issues include faulty fill valves, incorrectly positioned fill tubes or overflow tubes, and broken flush valve assemblies. To fix the problem, start by inspecting the tank lid and tank-to-bowl gasket for signs of wear and tear. Inspect all parts within the tank, including the float ball fill valve assembly, float arm, cup, flush valve assembly, flush valve nut, and fill valve tube. Replace any worn-out parts. Test whether the new parts are working properly by turning on the main water supply line and flushing twice.
If there are still weak flushes, check for additional entry points like an inadequate siphon jet or a poorly adjusted float rod. You may need to replace the flapper as well. Once you have addressed all of these issues, your running toilet should be fixed.
common fill valve problems

To fix a running toilet, it is important to identify the problem, and one common issue is a faulty fill valve. This valve regulates the water that enters and leaves the toilet tank. A traditional type of fill valve is the float ball fill valve, which uses a float ball attached to an arm to regulate water flow. If excess water is being released, this could be due to something caught around the valve, too much pressure on the arm, or an improperly adjusted float. To check for these issues, inspect and clean the valve’s assembly parts, adjust the float, and inspect the tank’s bottom for any defects or loose bolts. Fixing a faulty fill valve can prevent a running toilet, leading to lower water bills and a more efficient home.
how the flapper and flush valve work and what can go wrong

To fix a running toilet, understanding the flapper and flush valve is important. The flapper serves as a lid that keeps water in the tank until you flush. When you do, it opens, allowing water into the toilet bowl. A clogged or faulty fill valve assembly can also cause a running toilet. To fix the issue, turn off the water supply and remove the tank lid and tank-to-bowl gasket. Use channel locks or an adjustable wrench to adjust or replace the old fill valve assembly. Create a seal between hardware components to prevent leaks. Test the toilet by flushing it and ensuring no water is sloshing or flowing out of the bowl.
less common issues that can cause a running toilet, such as a siphon jet problem or faulty overflow tube

To fix a running toilet, it’s important to understand less common causes such as a siphon jet issue or a faulty fill valve assembly. A siphon jet issue can occur when the overflow tube height is not set properly and too much water enters the siphon jet hole, causing water to continually fill the tank. A faulty or old fill valve assembly can also cause excess water to remain in the tank, leading to a constantly running toilet. To test if this is the issue, turn off the water supply line and flush the toilet. If the problem persists, consider seeking professional help from a local hardware store.
tools and supplies needed to fix a running toilet
To fix a running toilet, you’ll need an overflow tube, fill valve, flush valve assembly, water supply line, tank lid, tank to bowl gasket, and tools such as channel locks and an adjustable wrench. Start by turning off the water inlet line, removing the tank lid, and checking for wear or damage to each part of the system, including the primary flush valve assembly and the secondary entry points. To replace an old fill valve assembly, unscrew its retaining nut, remove the old valve, and insert the new one, then reattach the float arm to adjust the water level. Smooth out any kinks or bends in the piping, affix the new flapper assembly, and test the toilet to ensure it’s working properly. Following these steps will restore your toilet’s normal function and help avoid higher water bills.
Step-by-Step Guide: Fixing a Running Toilet
Locating and replacing a few parts fixes a running toilet. This guide will help you fix a running toilet.
First, determine which part of the toilet is running—fill valve, flush valve, overflow tube, or other. If your toilet runs, replace the fill valve. Between the toilet tank and bowl is this part. The fill valve assembly has an adjustable float arm or ball float on a long slim cylinder. Check for cracks or damage that could be letting water into the bowl and running your toilet.
Replace a failing fill valve assembly
Replace a failing fill valve assembly with one from a local hardware store. Before unscrewing old numbers and parts, turn off your water supply and disconnect the water inlet line from the bottom of the tank lid and the wall side of your tank (using channel locks). Keep fill tube assembly connected as you remove old float arm or ball float from tank lid opening (including screws). Install new fill valve by placing top half into tank opening and screwing back onto wall side connecting points 1/4 turn anticlockwise (to avoid excess weight later on). Connect new fill tube between bottom entry point and top half area, then attach top half allen key screws back where they belong and gracefully tighten everything!
Fix flush valve by removing flapper area first if necessary
Fix flush valve by removing flapper area first if necessary. Unbolt two nuts around flapper area near overflow tube height and free any items caught underneath, such as small hairs (these often cause weak flush due to inability for flapper area membrane surface seals close over under-floor secondary entry points properly). Install flapper as instructed: Put base support ring over sewage exit pipe and insert cylinder portion downwards into spot in centre stack above where old flapper was usually; don’t forget special syphon jet piece that should go into cylinder portion correctly so everything fits firmly against inside walls when tightened!
Adjust float levels
Adjust float levels using rod/dial/ball system to put correct distance between bottom/top sides before screwing everything securely back together like before troubleshooting! Finally refill cup from outside supply line until hear water sloshing sound inside tank just enough times start flushing process yourself while ensuring no residual leakage comes through anywhere else thereby solving problem efficiently and cheaply – either way now should hopefully fix running toilet issue once and for all happily saving money off energy/water bills 🙂
How to Replace a Fill Valve Assembly
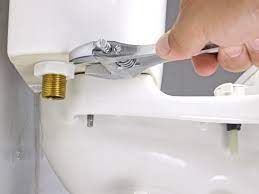
To replace a faulty fill valve assembly and fix a running toilet, start by turning off the water supply line and removing the lid and tank-to-bowl gaskets.
Locate the old fill valve assembly, which is responsible for controlling the amount of water that fills the tank after flushing. If your toilet keeps running, it likely has either a faulty fill valve or a stuck overflow tube. Choose a new fill valve assembly from your local hardware store, with float ball fill valves recommended.
Unscrew the flush valve nut and disconnect any other connection points caught underneath, then remove the old fill valve assembly from its hole in the tank’s bottom. Unscrew the plastic wing nuts on each side of the water inlet line, allowing access to the remaining components like the secondary entry point. Install the new fill valve tube/assembly and properly set up the water supply line to ensure an optimum flow rate. Flush twice to ensure proper flushing and tank filling, then replace the lids, making sure all interior gaskets are secure.
How to Replace a Flapper and different types of flappers
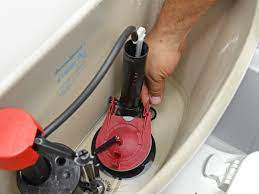
To replace a flapper, turn off the water supply and flush the toilet, remove the tank lid and overflow tube, locate and loosen the fill valve assembly, and remove any nuts, bolts, or screws holding the old flapper in place. Grip onto either end of the old flapper and slide it out gently before disposing of it properly. Check for wear and clean or adjust any fittings as necessary before installing a new fill valve assembly. Disconnect the current assembly, unscrew bolts and screws, lift out the old float ball, and clear the refill chamber of any debris. Reattach the new assembly and test the toilet’s operation at full power, being mindful of the need for regular replacements and potential for flooding if not properly maintained.
How to Adjust the Float
To fix a running toilet by adjusting the float, turn off the water supply and empty the tank. Check all parts of the flush and fill valve for damage or debris. If everything looks good, adjust the float located at the bottom of the tank on a float arm. Loosen the screw or nut near its base and adjust its height until it’s just below the overflow tube’s height when full. If none of these solutions work, it might be time to replace the old fill valve assembly or flush valve.
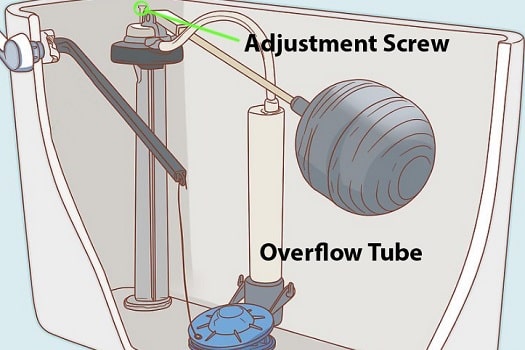
How the overflow tube works and what can go wrong
Overflow tubes and fill valves in toilet tanks often cause running toilets. When the toilet bowl is full, the overflow tube sends water to the tank, and the fill valve fills it. Troubleshooting each component to find the problem can be difficult.
If the overflow tube from the back of the toilet bowl to a pipe near the bottom of the tank is too short or improperly installed, it won’t allow enough water to drain out of your bowl and keep your toilet running. Check to see if your Tank’s Flush Valve assembly or Float Ball Fill Valve are malfunctioning, your toilet may run after flushing and need replacement parts.
If you suspect your overflow tube isn’t properly installed
measure its height above the finished floor (for most residential toilets this should be 6 to 8 inches). If not, remove the Tank Lid screws at either end and raise them to raise the Overflow Tube. Tighten these screws after adjustments to prevent leaks.
check all components of your Fill Valve Assembly
Next, check all components of your Fill Valve Assembly, as an old one can cause excessive water sloshing sounds when exiting through secondary entry points like Siphon Jets and Overflow Tube hole immediately above it. If everything checks out but your toilet still runs, you may need new Flapper Valves or a new Fill Valve Assembly (depending on how old yours currently is). Note that depending on the severity of the issue causing constant discharge leaks, other parts like float rod float arm/ball float ball cup/float cup may need replacing, as well as old bolts securing tank lid/tank bowl gasket, which may cause excessive leakage during flushing if reservoir doesn’t fill up fast enough due to pressure rise after lid is put back on tank and flush started again.
For peace of mind, call our plumbers if you can’t fix a running toilet.
How a running toilet can lead to higher water bills
To fix a running toilet, check the overflow tube and adjust its height if it’s too high. Then, remove any necessary parts such as the fill valve assembly and gasket, and detach tanks to bowl bolts. Turn off the water supply lines and reattach all parts, making sure they’re secure. Restart the water supply and check for leaks….
Conclusion
To fix a running toilet, first determine the cause, which could be a faulty fill valve, flapper, or overflow tube. Purchase the necessary parts and tools from a hardware store. Dismantle the toilet tank and make repairs as needed, such as adjusting floats or cleaning out debris. Pay attention to overflow tube height and water level. Reconnect all hoses and turn on the isolation valve to test the newly fixed toilet.
If you have had no luck in attempting this yourself or lack the time and expertise, it’s time get in the best plumbers in London town.
Call us at 020 8611 2591, and we’ll do our best to fix your toilet and any other plumbing issues .